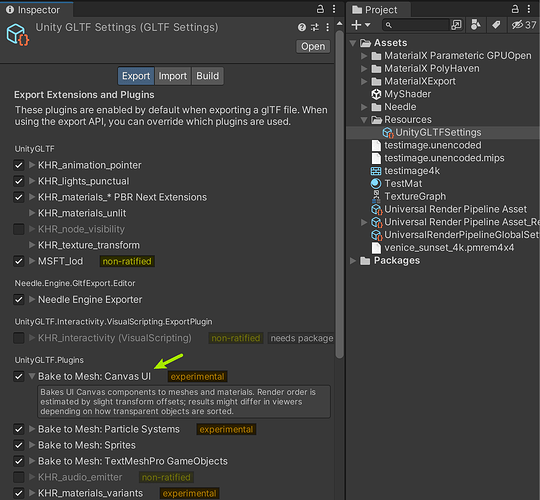
Hi Katja, thanks for your message. Currently there isn’t a built‐in or officially supported “convert canvas to mesh” script in Needle Engine that will automatically take all your Unity Canvas elements (images and texts) and convert them into 3D objects for USDZ export. Since USDZ requires real 3D geometry with materials and cannot directly render Canvas UI (which is typically screen-space), you have to bake the UI into meshes with textures.
One common approach is to write an Editor conversion script in Unity that iterates over your Canvas children and for each UI element creates a corresponding quad (or a more advanced mesh) positioned exactly where the UI element appears. For UI Images, the process involves:
• Reading the RectTransform dimensions,
• Creating a plane (quad) whose size matches the UI element,
• Extracting the sprite’s texture,
• Creating a material (often using an Unlit/Transparent shader to mimic UI appearance), and
• Assigning this material to the mesh so that when exported to USDZ the UI is visible in AR.
For UI Text, the conversion is a bit more involved. Often you have two options:
• Bake the rendered text into a texture (through a render-to-texture process) and apply it to a quad, or
• Use a text-to-mesh tool (for example, generating geometry based on a font) so that the text becomes editable 3D geometry.
Below is a simplified sample Editor script in C# to convert UI Image elements on a Canvas to meshes with materials. You can adapt this script to your project as a starting point:
using UnityEngine;
using UnityEngine.UI;
using UnityEditor;
using System.Collections.Generic;
public class CanvasToMeshConverter : EditorWindow
{
GameObject selectedCanvas;
[MenuItem("Tools/Canvas To Mesh Converter")]
static void Init()
{
    CanvasToMeshConverter window = (CanvasToMeshConverter)GetWindow(typeof(CanvasToMeshConverter));
    window.Show();
}

void OnGUI()
{
    GUILayout.Label("Convert Canvas UI elements to 3D meshes", EditorStyles.boldLabel);
    selectedCanvas = (GameObject)EditorGUILayout.ObjectField("Canvas", selectedCanvas, typeof(GameObject), true);

    if(selectedCanvas && GUILayout.Button("Convert"))
    {
        ConvertCanvas(selectedCanvas);
    }
}

void ConvertCanvas(GameObject canvasGO)
{
    Canvas canvas = canvasGO.GetComponent<Canvas>();
    if(canvas == null)
    {
        Debug.LogError("Selected object is not a Canvas");
        return;
    }

    // Convert all Image components on the Canvas
    List<Image> images = new List<Image>(canvasGO.GetComponentsInChildren<Image>());
    foreach (var image in images)
    {
        CreateMeshFromUIElement(image.gameObject);
    }
    // For Text elements, implement a similar conversion method.
}

void CreateMeshFromUIElement(GameObject uiElement)
{
    RectTransform rect = uiElement.GetComponent<RectTransform>();
    if(rect == null) return;

    // Create new GameObject for the mesh
    GameObject meshGO = new GameObject(uiElement.name + "_Mesh");
    meshGO.transform.position = uiElement.transform.position;
    meshGO.transform.rotation = uiElement.transform.rotation;
    meshGO.transform.localScale = uiElement.transform.lossyScale;

    MeshFilter meshFilter = meshGO.AddComponent<MeshFilter>();
    MeshRenderer meshRenderer = meshGO.AddComponent<MeshRenderer>();

    Mesh mesh = new Mesh();
    float width = rect.rect.width;
    float height = rect.rect.height;
    // Define vertices for a quad.
    Vector3[] vertices = new Vector3[4];
    vertices[0] = new Vector3(-width / 2, -height / 2, 0);
    vertices[1] = new Vector3(width / 2, -height / 2, 0);
    vertices[2] = new Vector3(-width / 2, height / 2, 0);
    vertices[3] = new Vector3(width / 2, height / 2, 0);
    mesh.vertices = vertices;

    // Standard UV mapping.
    mesh.uv = new Vector2[] { new Vector2(0, 0), new Vector2(1, 0), new Vector2(0, 1), new Vector2(1, 1) };
    mesh.triangles = new int[] { 0, 2, 1, 2, 3, 1 };
    mesh.RecalculateNormals();
    meshFilter.sharedMesh = mesh;

    // If the UI element is an Image, apply its sprite texture (if available).
    Image img = uiElement.GetComponent<Image>();
    if(img != null && img.sprite != null)
    {
        Material mat = new Material(Shader.Find("Unlit/Transparent"));
        mat.mainTexture = img.sprite.texture;
        meshRenderer.sharedMaterial = mat;
    }
    else
    {
        // fallback material
        meshRenderer.sharedMaterial = new Material(Shader.Find("Unlit/Color"));
    }
}
}
This script provides a basic conversion of Image components. For text, consider either capturing a render texture snapshot or using a tool that converts TextMeshPro objects to meshes. Once your UI is converted to world-space meshes, the USDZ exporter (which relies on proper 3D geometry and materials as seen in Needle Engine’s USDZ export code at ThreeUSDZExporter.d.ts.md) can process them correctly so they show up in iOS AR.
If you have animated canvases, you may need to adapt your animation workflows to target these new mesh objects instead of the Canvas. Bear in mind that animation clips on UI elements might have to be retargeted or recreated for the corresponding mesh objects.
I hope this helps you get started. Let me know if you need further guidance or additional clarification on any part of the conversion process.
4 replies left
thread_RtVPUlO9wwOVv4OSAYZpVB1o
Reply to this post directly if you need further help (bottom right button)
![]() , is there maybe a trick, how to convert all Unity Canvas Objects ( Images and Text) into 3D Objects, so they will be visible in AR USDZ?
, is there maybe a trick, how to convert all Unity Canvas Objects ( Images and Text) into 3D Objects, so they will be visible in AR USDZ?![]()

